13 ウェブスクレイピング

Wi-Fiがつながらないというめったにない恐ろしい瞬間に、私は自分がコンピュータで行っていることの大半が実はインターネットで行っていることに気づきました。習慣的に、メールをチェックし、ソーシャルメディアを読み、「カートウッド・スミスは1987年の初代ロボコップに出演する前に主要な役を演じたことがあるか」1といった質問に答えています。
コンピュータで行う作業の多くはインターネットと関係していますから、プログラムでもインターネットに接続できるといいです。ウェブスクレイピングはプログラムを使ってウェブ上のコンテンツをダウンロードしたり処理したりすることを指します。例えば、Googleはウェブスクレイピングプログラムをたくさん実行し、検索エンジン用にウェブページのインデックスを作成しています。本章では、以下のモジュールを使って、Pythonでウェブスクレイピングを行います。
webbrowser Pythonに付属していて、指定したページをブラウザで開きます。
requests インターネット上のファイルとウェブページをダウンロードします。
Beautiful Soup (bs4) ウェブページを作成する言語であるHTMLを解析し、必要な情報を抽出します。
Selenium ウェブブラウザを起動して制御します。フォームの入力やマウスクリックなどができます。
Playwright ウェブブラウザを起動して制御します。Seleniumよりも新しく、機能が追加されています。
HTTPとHTTPS
ウェブサイトを訪問するときに、https://
より正確に言うと、HTTPSはHTTPを暗号化したもので、インターネットを使用する間のプライバシーを保護します。HTTPを使っているとしたら、なりすまし犯や国の諜報機関やインターネットサービスプロバイダーが、送信したパスワードやクレジットカード情報なども含めて、訪問したウェブページの内容を見ることができます。VPNを使うと、インターネットサービスプロバイダーがインターネット通信の中身を見ることはできなくなりますが、VPNプロバイダはインターネット通信の中身を見ることができます。悪質なVPNプロバイダは、訪問したウェブサイトについての情報をデータブローカーに売るかもしれません。(Tom ScottはVPNがすることとしないことを、“This Video Is Sponsored by VPN.”という動画で論じています。)
これとは対照的に、HTTPSで閲覧したページの内容は、暗号化されて秘匿されます。かつてはパスワードやクレジットカード番号を送信するページでのみHTTPSが使われていましたが、現在では大部分のウェブサイトですべての通信が暗号化されています。それでも、どのウェブサイトを訪問したかはわかってしまうことに気をつけてください。CatPhotos.comから何をダウンロードしたかを見ることはできませんが、CatPhotos.comのウェブサイトに接続したことはわかり、きっとネコの写真を見たのだろうと推測することができてしまいます。Tor匿名ネットワークを使うTorブラウザなら、真に匿名的なウェブブラウズが可能です。https://
プロジェクト6:webbrowserモジュールを使用してプログラムを実行する
Pythonのwebbrowserモジュールをプログラミングで使うことについて説明します。webbrowserモジュールのopen()関数は、ブラウザを立ち上げて指定したURLを開きます。以下の式を対話型シェルに入力してみてください。
>>> import webbrowser
>>> webbrowser.open('https://inventwithpython.com/')
URLがhttps://
例えば、OpenStreetMapで地図を表示したいと思ったときに、毎回住所をクリップボードにコピーするのは面倒です。クリップボードの内容をもとにして自動的にブラウザで地図を立ち上げるちょっとしたスクリプトを書けば、この作業から数ステップを減らすことができます。こうすれば、住所をクリップボードにコピーして、地図を表示するスクリプトを実行するだけですみます。OpenStreetMapのURLに直接住所を埋め込めますから、webbrowser.open()関数だけで実現できます。
このプログラムには以下の内容が必要です。
- コマンドライン引数またはクリップボードから住所を取得する
- ウェブブラウザでその住所のOpenStreetMapのページを開く
コードには以下の内容が必要になります。
- sys.argvからコマンドライン引数を読み取る
- クリップボードの内容を読み取る
- webbrowser.open()関数を呼び出してウェブブラウザを開く
新しいファイルエディタタブを開いて、showmap.pyという名前で保存します。
ステップ1:URLを理解する
第12章の手順に沿って、showmap.pyファイルを、次のようにコマンドラインから実行できるようにします。
C:\Users\al> showmap 777 Valencia St, San Francisco, CA 94110このスクリプトはクリップボードではなくコマンドライン引数を優先的に使います。コマンドライン引数がなければクリップボードの内容を使います。
このプログラムでは、住所を指定するURLの仕組みを理解する必要があります。ブラウザでhttps://
アドレスバーから取り出したURLの#mapの部分は不要です(実験してみればわかります)。よって、プログラムでhttps://
ステップ2:コマンドライン引数を処理する
コードは次のようになります。
# showmap.py - コマンドラインまたはクリップボードから
# 住所を指定してブラウザで地図を起動する

import webbrowser, sys
if len(sys.argv) > 1:
    # コマンドラインから住所を取得
    address = ' '.join(sys.argv[1:])

# TODO: クリップボードから住所を取得

# TODO: ウェブブラウザを開く
まず、ブラウザを起動するためにwebbrowserモジュールを、コマンドライン引数を読み取るためにsysモジュールを、インポートする必要があります。変数sys.argvにはプログラムのファイル名とコマンドライン引数がリストとして格納されています。このリストにファイル名以外のものが含まれていたら、len(sys.argv)が1より大きい数に評価されるので、コマンドライン引数があったということになります。
コマンドライン引数は通常スペースで区切られますが、今回はすべての引数を一つの文字列として解釈したいです。sys.argvは文字列のリストですから、join()メソッドに渡して一つの文字列値にします。この文字列でプログラム名は不要ですから、配列の最初の要素を削ぎ落とすために、sys.argvではなくsys.argv[1:]を渡します。この式が最終的に評価する値を変数addressに格納します。
このプログラムをコマンドラインからこのように実行すると
showmap 777 Valencia St, San Francisco, CA 94110変数sys.argvは次のようなリスト値になります。
['showmap.py', '777', 'Valencia', 'St, ', 'San', 'Francisco, ', 'CA', '94110']sys.argv[1:]をスペース文字で連結すると、変数addressには'777 Valencia St, San Francisco, CA 94110'が格納されます。
ステップ3:クリップボードの内容を取得する
クリップボードからURLを取得するコードは次のようになります。
# showmap.py - コマンドラインまたはクリップボードから
# 住所を指定してブラウザで地図を起動する

import webbrowser, sys, pyperclip
if len(sys.argv) > 1:
    # コマンドラインから住所を取得
    address = ' '.join(sys.argv[1:])
else:
    # クリップボードから住所を取得
    address = pyperclip.paste()

# ウェブブラウザを開く
webbrowser.open('https://www.openstreetmap.org/search?query=' + address)
コマンドライン引数がなければ、クリップボードにある住所を使います。pyperclip.paste()でクリップボードの内容を取得し、変数addressに保存します。最後に、webbrowser.open()を呼び出して、OpenStreetMapのURLをウェブブラウザで開きます。
何時間も節約してくれるような大きな作業を行うプログラムを書くこともできれば、指定した住所の地図を開くといった、日常的な作業で数秒を節約してくれるプログラムを書くこともできます。表13-1はshowmap.pyプログラムがある場合とない場合とで地図を表示するのに必要なステップを比較しています。
手動で地図を表示する |
showmap.pyを使う |
|---|---|
1. 住所を選択する |
1. 住所を選択する |
2. 住所をコピーする |
2. 住所をコピーする |
3. ブラウザを開く |
3. showmap.pyを実行する |
4. https:// |
|
5. 住所を入力するテキストフィールドをクリックする |
|
6. 住所を貼り付ける |
|
7. ENTERを押す |
OpenStreetMapのウェブサイトは、住所の情報を直接URLに埋め込めたため、地図を表示するのに操作が不要だったのは幸運でした。showmap.pyスクリプトのおかげで指定した住所の地図を表示するという作業が楽になりました。
似たようなプログラムのアイデア
URLさえあれば、webbrowserモジュールでブラウザを操作してウェブサイトを開けます。この機能を利用した以下のようなプログラムが考えられます。
- あるページ上のすべてのリンクをブラウザの別タブで開く
- 地域の天気予報サイトのURLをブラウザで開く
- 日常的にチェックしているソーシャルネットワークのサイトやブックマークしたサイトを開く
- ハードドライブ上のローカル.htmlファイルを開く
最後のものはヘルプファイルを表示するのに使えます。print()でヘルプページを表示することもできますが、webbrowser.open()を呼び出して.htmlファイルを開くと、フォント、色、表、画像などを使ってヘルプ情報を伝えられます。https://ではなくfile://を使ってください。例えば、Desktopフォルダにhelp.htmlファイルがあるとしたら、Windowsではfile:///C:/Users/al/Desktop/help.html、macOSではfile:///Users/al/Desktop/help.htmlを開きます。
requestsモジュールでウェブからファイルをダウンロードする
requestsモジュールを使うと簡単にウェブからファイルをダウンロードできます。ネットワークエラー、接続のルーティング、データ圧縮といったややこしいことは考えずにすみます。このモジュールはPythonに付属していませんので、付録Aの指示に従ってインストールします。
ウェブページをダウンロードする
requests.get()関数はダウンロードするURLを表す文字列を取ります。この関数の返り値についてtype()を呼び出すと、Responseブジェクトが返されることがわかります。Responseオブジェクトには、ウェブサーバーからのリクエストに対する応答(レスポンス)が含まれています。Responseオブジェクトについてはあとで詳しく説明しますが、今のところはインターネットに接続しているコンピュータで以下の内容を対話型シェルに入力してみてください。
>>> import requests
❶ >>> response = requests.get('https://automatetheboringstuff.com/files/rj.txt')
>>> type(response)
<class 'requests.models.Response'>
❷ >>> response.status_code == requests.codes.ok
True
>>> len(response.text)
178978
>>> print(response.text[:210])
The Project Gutenberg EBook of Romeo and Juliet, by William Shakespeare

This eBook is for the use of anyone anywhere at no cost and with
almost no restrictions whatsoever.  You may copy it, give it away or
このURLは『ロミオとジュリエット』の全文のウェブページです(❶)。Responseオブジェクトのstatus_code属性をチェックすれば、そのウェブページへのリクエストが成功したかどうかがわかります。requests.codes.okの値と等しければ、うまくいっています(❷)。(ちなみに、HTTPの成功のステータスコードは200です。Not Foundのステータスコードである404はおなじみかもしれません。)
リクエストが成功したら、ダウンロードしたウェブページはResponseオブジェクトのtext属性に文字列として保存されています。この大きな文字列には『ロミオとジュリエット』の全体が入っています。len(response.text)を呼び出すと178,000文字以上であることがわかります。最後にprint(response.text[:210])を呼び出して最初の210文字だけを表示しています。
リクエストが失敗して“Failed to establish a new connection”や“Max retries exceeded”のようなエラーメッセージが表示されたら、インターネット接続を確認してください。サーバーへの接続は非常に複雑であるため、あらゆる問題の可能性をここで挙げることはできません。クォートで囲まれたエラーメッセージをウェブで検索すれば、一般的なエラーの原因がわかるはずです。requestsでウェブページをダウンロードすると、HTMLの内容だけが取得されることを覚えておいてください。画像その他のメディアは別途ダウンロードする必要があります。
エラーをチェックする
すでに見たように、Responseオブジェクトにはstatus_code属性があり、requests.codes.okと照合することで、ダウンロードが成功したかどうかを確認することができます。Responseオブジェクトのraise_for_status()メソッドを呼び出すと、成功したかどうかをもっと簡単にチェックできます。このメソッドは、ファイルのダウンロード中にエラーが発生した場合に例外を送出し、ダウンロードが成功したら何もしません。以下の式を対話型シェルに入力してみてください。
>>> response = requests.get('https://inventwithpython.com/page_that_does_not_exist')
>>> response.raise_for_status()
Traceback (most recent call last):
  File "<python-input-0>", line 1, in <module>

  File "C:\Users\Al\AppData\Local\Programs\Python\PythonXX\lib\site-packages\
requests\models.py", line 940, in raise_for_status
    raise HTTPError(http_error_msg, response=self)
requests.exceptions.HTTPError: 404 Client Error: Not Found for url:
https://inventwithpython.com/page_that_does_not_exist.html
raise_for_status()メソッドは、ダウンロードがうまくいかなかった場合にプログラムを停止させる簡単な方法です。一般的に、予期せぬエラーが発生したらすぐにプログラムを止めたいでしょう。ダウンロードが失敗しても構わないのであれば、raise_for_status()の行をtry文とexcept文ではさんでプログラムを止めずにエラーを処理できます。
import requests
response = requests.get('https://inventwithpython.com/page_that_does_not_exist')
try:
    response.raise_for_status()
except Exception as exc:
    print(f'There was a problem: {exc}')
このraise_for_status()メソッド呼び出しは、以下のように出力します。
There was a problem: 404 Client Error: Not Found for url:
https://inventwithpython.com/page_that_does_not_exist.html
必ずrequests.get()を呼び出してからraise_for_status()を呼び出してください。プログラムを継続する前にダウンロードがうまくいったかどうか確かめるようにしてください。
ダウンロードしたファイルをハードドライブに保存する
open()関数とwrite()メソッドでウェブページをハードドライブに保存してみましょう。open()の第二引数に文字列'wb'を渡してバイナリ書き込みモードでファイルを開きます。 (先ほどダウンロードした『ロミオとジュリエット』のように)ページはプレーンテキストであっても、テキストのUnicodeエンコーディングを維持するためにテキストデータをバイナリデータで書き込む必要があります。
ウェブページをファイルに書き込むには、Responseオブジェクトのiter_content()メソッドをforループで使います。
>>> import requests
>>> response = requests.get('https://automatetheboringstuff.com/files/rj.txt')
>>> response.raise_for_status()
>>> with open('RomeoAndJuliet.txt', 'wb') as play_file:
...     for chunk in response.iter_content(100000):
...         play_file.write(chunk)
...
100000
78978
iter_content()メソッドはループの反復ごとに内容の「チャンク」(ひとかたまり)を返します。チャンクはバイトデータ型で、一つのチャンクを何バイトにするか指定します。10万バイトがちょうどよいのでiter_content()に100000を渡します。
ファイルRomeoAndJuliet.txtが現在の作業ディレクトリに現れます。ウェブサイト上のファイル名はrj.txtでしたが、ハードドライブ上では別の名前にしています。
write()メソッドはファイルに書き込んだバイト数を返します。先の例では、最初のチャンクで100,000バイト書き込み、残りの部分は78,978バイトでした。
これでrequestsモジュールの説明は終わりです。このモジュールの他の機能についてはhttps://
YouTube、Facebook、X(旧Twitter)その他のサイトから動画ファイルをダウンロードしたい場合は、第24章で取り上げるyt-dlpモジュールを使ってください。
天気APIにアクセスする
アプリは人間のユーザー用に設計されています。ただし、API(Application Programming Interface)を通じて他のプログラムとやり取りをするプログラムを書くことができます。APIとは、あるソフトウェア(自分が書いたPythonプログラム)が別のソフトウェア(天気情報サイトのサーバー)とやり取りする方法を定義した仕様のことです。オンラインサービスにはAPIが用意されていることが多いです。例えば、(サービス側で用意されたAPIを活用して)ソーシャルメディアの自分のアカウントに投稿したり、新しい写真をダウンロードしたりするPythonスクリプトを書けます。この節では、無料のOpenWeatherサイトから天気情報にアクセスするスクリプトを書きます。
ほぼすべてのオンラインサービスでAPIを利用するのにメールアドレスの登録を求められます。APIの利用は無料であっても、1時間や1日あたりにリクエストできる回数に制限がある場合があります。スパムメールが気になるなら、https://
最初にhttps://
HTTPのAPIはレスポンスを大きな文字列で返すことが多いです。この文字列はJSON形式かXML形式でフォーマットされているのがほとんどです。第18章でJSONとXMLについて詳しく説明しますが、今のところは、json.loads(response.text)が、response.textのJSONデータを、リストと辞書というPythonのデータ構造に変換して返すということさえ知っておけば十分です。本章の例ではresponse_dataという名前の変数にこのデータを格納しますが、どのような名前でも構いません。
オンラインサービスごとにAPIの使い方を説明したドキュメントが提供されています。OpenWeatherはhttps://
まず、OpenWeatherでサンフランシスコの緯度と経度を調べてみましょう。
>>> import requests
>>> city_name = 'San Francisco'
>>> state_code = 'CA'
>>> country_code = 'US'
>>> API_key = '30ee784a80d81480dab1749d33980112'  # うそのAPIキー
>>> response = requests.get(f'https://api.openweathermap.org/geo/1.0/
direct?q={city_name},{state_code},{country_code}&appid={API_key}')
>>> response.text  # Pythonの文字列
'[{"name":"San Francisco","local_names":{"id":"San Francisco",
--snip--
,"lat":37.7790262,"lon":-122.419906,"country":"US","state":"California"}]'
>>> import json
>>> response_data = json.loads(response.text)
>>> response_data  # Pythonのデータ構造
[{"name":"San Francisco","local_names":{"id":"San Francisco",
--snip--
,"lat":37.7790262,"lon":-122.419906,"country":"US","state":"California"}]
レスポンスのデータを理解するには、OpenWeatherのAPIのオンラインドキュメントを参照するか、対話型シェルでresponse_dataの辞書データを調べます。レスポンスはリストであり、その最初の要素(インデックス0)は'lat'と'lon'のキーがある辞書です。これらのキーの値は緯度と経度の浮動小数点数値です。
>>> response_data[0]['lat']
37.7790262
>>> response_data[0]['lon']
-122.419906
APIリクエストを行うためのURLはエンドポイントと呼ばれます。この例のf文字列は波かっこの部分を変数の値で置き換えます。先の例のdirect?q={city_name},{state_code},{country_code}&appid={API_key}'はdirect?q=San Francisco,CA,US&appid=30ee784a80d81480dab1749d33980112'になります。
次に、この緯度と経度を使ってサンフランシスコの現在の気温を調べましょう。
>>> lat = json.loads(response.text)[0]['lat']
>>> lon = json.loads(response.text)[0]['lon']
>>> response = requests.get(f'https://api.openweathermap.org/data/2.5/
weather?lat={lat}&lon={lon}&appid={API_key}')
>>> response_data = json.loads(response.text)
>>> response_data
{'coord': {'lon': -122.4199, 'lat': 37.779}, 'weather': [{'id': 803,
--snip--
'timezone': -25200, 'id': 5391959, 'name': 'San Francisco', 'cod': 200}
>>> response_data['main']['temp']
285.44
>>> round(285.44 - 273.15, 1)  # ケルビンから摂氏への変換
12.3
>>> round(285.44 * (9 / 5) - 459.67, 1)  # ケルビンから華氏への変換
54.1
OpenWeatherはケルビン単位の気温を返すので、摂氏や華氏の気温を取得するには少し計算する必要があります。
先の例の位置情報エンドポイントのURLを分解します。
https:// サーバーにアクセスするスキーマです。プロトコル名(オンラインのAPIならほぼすべてHTTPSです)にコロンとスラッシュを2つつけます。
api.openweathermap.org APIリクエストを処理するウェブサーバーのドメイン名です。
/geo/1.0/direct APIのパスです。
?q={city_name},{state_code},{country_code}&appid={API_key} URLクエリ文字列です。波かっこ内の部分は実際の値に置き換える必要があります。これらは関数呼び出しのパラメータのようなものです。URLエンコードでは、パラメータ名と引数値はイコール記号で区切られ、複数の引数はアンド記号で区切られます。
エンドポイントURL(とクエリ文字列)をコピーしてウェブブラウザに貼り付けると、レスポンスのテキストを直接見ることができます。APIの使い方を初めて調べるときに、そのようにしてレスポンスのテキストを直接見ると理解が進みます。ウェブベースのレスポンスのテキストはほとんどの場合でJSON形式またはXML形式にフォーマットされています。
APIを更新する際の混乱を避けるために、ほとんどのオンラインサービスのAPIではバージョン番号がURLに含まれています。時間が経つにつれてサービスは新しいバージョンのAPIをリリースし、古いバージョンが非推奨になることがあります。そうなると、APIを利用し続けるにはスクリプト中のコードを更新しなければなりません。
OpenWeatherの無料アカウントでは5日分の天気予報と、降水、風、大気汚染の情報が利用できます。そのデータを取得するのにアクセスするURLと、そのAPIを呼び出したJSONレスポンスの構造は、オンラインドキュメントに書かれています。以下の数節のコードでは、response_data = json.loads(response.text)で、ウェブサイトから返されたテキストをPythonのデータ構造に変換したと仮定します。
緯度と経度を調べる
指定した都市の緯度と経度を取得するエンドポイントはhttps://
response_data[0]['lat'] その都市の緯度を表す浮動小数点数値
response_data[0]['lon'] その都市の経度を表す浮動小数点数値
都市名が複数のレスポンスにマッチする場合は、リストresponse_dataにresponse_data[0]、response_data[1]…という辞書が含まれます。OpenWeatherでその都市が見つからなければ、response_dataは空リストになります。
現在の天気を取得する
緯度と経度をもとに現在の天気情報を取得するエンドポイントはhttps://
response_data['weather'][0]['main'] 'Clear'、'Rain'、'Snow'など天気を説明する文字列
response_data['weather'][0]['description'] 'light rain'、'moderate rain'、'extreme rain'など天気を詳しく説明する文字列
response_data['main']['temp'] ケルビン単位の現在の気温
response_data['main']['feels_like'] ケルビン単位の体感気温
response_data['main']['humidity'] 湿度
正しくない緯度と経度を指定すると、response _dataは{"cod":"400","message":"wrong latitude"}のような辞書になります。
天気予報を取得する
緯度と経度をもとに5日間の天気予報を取得するエンドポイントはhttps://
response_data['list'] 時間ごとの天気予報を含む辞書のリスト
response_data['list'][0]['dt'] Unix時間形式のタイムスタンプ。この値をdatetime.datetime.fromtimestamp()に渡すとdatetimeオブジェクトが得られます。第19章でPythonのdatetimeモジュールについてもっと詳しく説明します。
response_data['list'][0]['main'] 'temp'、'feels_like'、'humidity'その他のキーがある辞書
response_data['list'][0]['weather'][0] 'main'、'description'その他のキーがある辞書
リストresponse_data['list']には、3時間ごとに5日間の予報を含む40の辞書があります。このAPIの将来のバージョンでは変更があるかもしれません。
APIを探求する
https://
HTMLを理解する
ウェブページを分析する前に、HTML(HyperText Markup Language)の基礎を学ぶ必要があります。HTMLはウェブページを記述するフォーマットで、CSS(Cascading Style Sheets)はウェブページのHTML要素の見た目を変化させる方法です。この章では基本的なHTMLを扱った経験があることを前提とします。初心者向けのチュートリアルが必要なら、以下のサイトをおすすめします。
- https://
developer .mozilla .org /en -US /docs /Learn /HTML - https://
www .freecodecamp .org /news /html -coding -introduction -course -for -beginners - https://
www .khanacademy .org /computing /computer -programming /html -css
この節では、ウェブブラウザの強力なデベロッパーツールの使い方も説明します。デベロッパーツールを活用すると、ウェブからの情報のスクレイピングがやりやすくなります。
フォーマットの説明
HTMLファイルはファイル拡張子.htmlのプレーンテキストファイルです。テキストは、小なり記号と大なり記号(<>)で囲まれたHTMLタグであふれています。タグがブラウザにウェブページのフォーマットを伝えます。開始タグと終了タグの間にテキストがあり、これらをまとめてHTML要素と呼びます。開始タグと終了タグの間のテキストがブラウザに表示されます。例えば、以下のHTMLは、ブラウザでHelloの部分が太字のHello, world!を表示します。
<b>Hello</b>, world!ブラウザではこのHTMLが図13-1のように見えます。
図 13-1:ブラウザで表示されたHello, world!
開始<b>タグと終了</b>タグの間のテキストは太字で表示するようにブラウザに伝えられます。これが<b>Hello</b>という要素になります。
HTMLにはさまざまなタグがあります。小なり記号と大なり記号の間に属性と呼ばれるプロパティを持つタグもあります。例えば、<a>タグはリンクを表し、href属性がリンク先のURLです。次に例を示します。
<a href="https://inventwithpython.com”>This text is a link</a>そのページ内で要素を一意に識別するためにid属性を持つ要素があります。プログラムではid属性で要素を探し出すことが多いですから、ブラウザのデベロッパーツールでこの属性を見つけるのは、ウェブスクレイピングプログラムを書くときによく行う作業です。
ウェブページのソースを見る
プログラムが対象とするウェブページのHTML(ソースと呼ばれます)を見る必要があります。ウェブブラウザでソースを見たいページを開き、右クリック(macOSではCTRL-クリック)して「ソースを表示」や「ページのソースを表示」を選びます(図13-2)。ソースはブラウザが実際に受け取っているテキストです。ブラウザはこのHTMLからウェブページを表示(描画)します。

図 13-2:ウェブページのソースを表示
お好きなサイトのHTMLのソースを表示してみてください。ソースを完全に理解できなくても大丈夫です。単純なウェブスクレイピングプログラムを書くのにHTMLをマスターする必要はありません。既存のサイトからデータを抜き出すために必要な知識があれば足ります。
ブラウザのデベロッパーツールを開く
ブラウザのデベロッパーツールを使うと、ウェブページのソースを見るだけでなく、ページの表示と対応させてHTMLを確認できます。Firefox、Chrome、Microsoft Edgeでは、F12を押すとそのためのツールが開きます(図13-3)。もう一度F12押すとその画面が消えます。
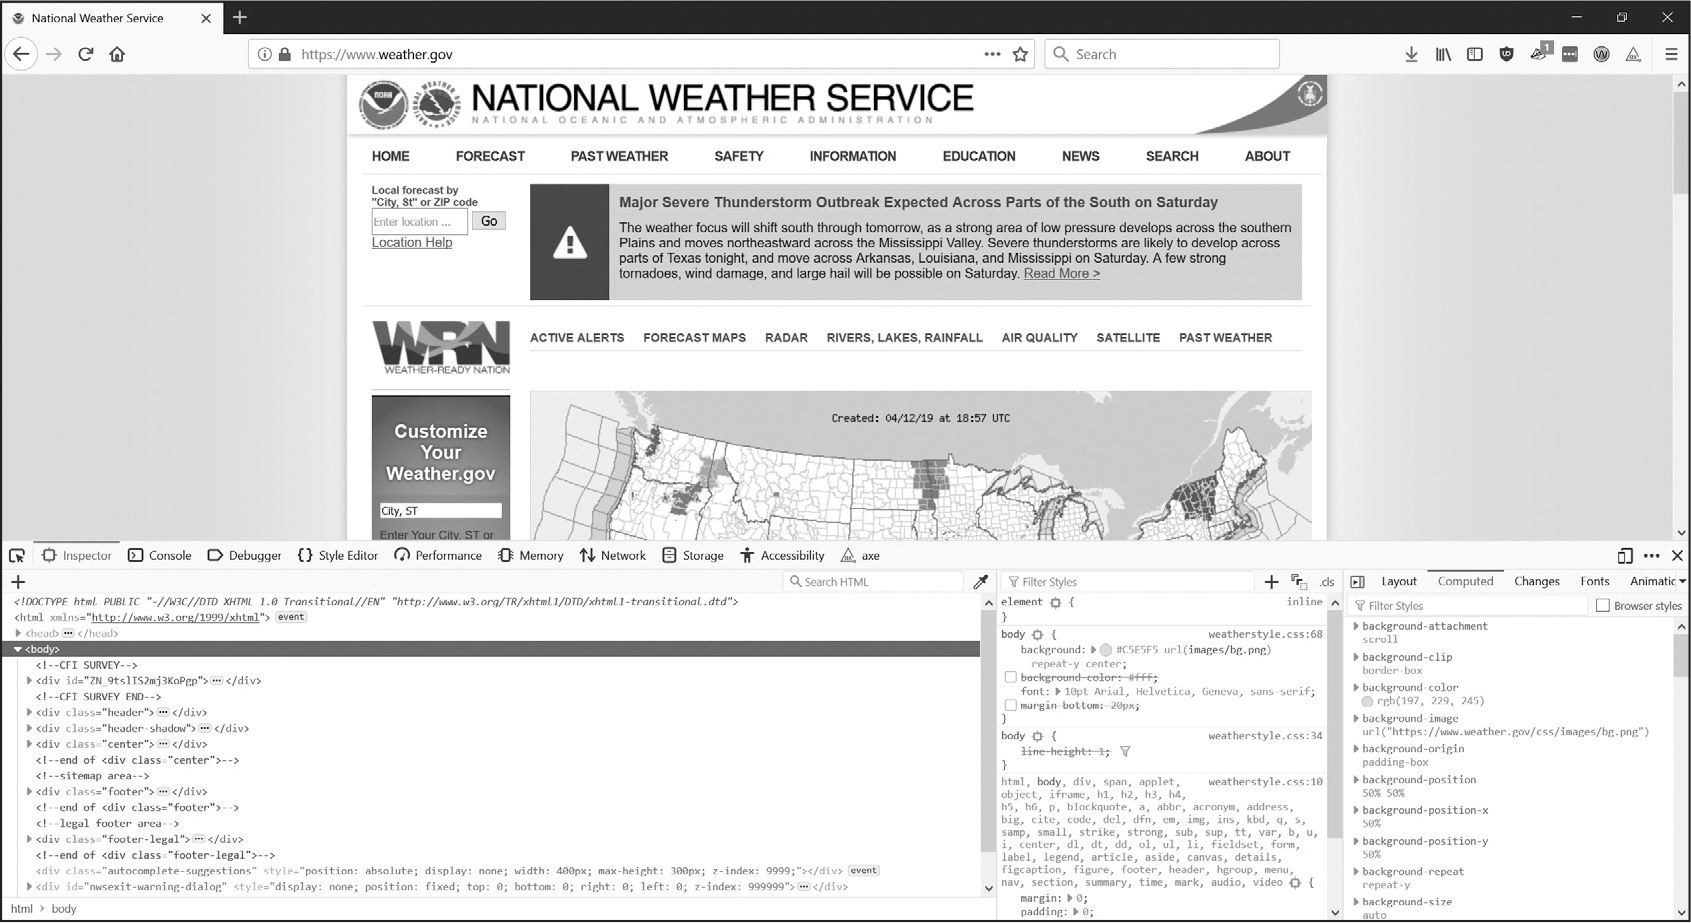
図 13-3:Chromeブラウザのデベロッパーツールウィンドウ
ウェブページの任意の場所で右クリックをしてコンテキストメニューから検証を選ぶと、ページのその部分に対応するHTMLを確認できます。ウェブスクレイピングプログラムでHTMLを解析するのに役立ちます。
HTML要素を見つける
requestsモジュールでウェブページをダウンロードしたら、そのページのHTMLを一つの文字列値として取得できます。ほしい情報がそのHTMLのどの部分に対応するのか見つけ出す必要があります。
ここでブラウザのデベロッパーツールが役立ちます。例えば、https://
そのZIPコードの天気予報をスクレイピングしたいとしたらどうすればいいでしょうか。ほしいページの情報の部分で右クリック(macOSではCTRL-クリック)して、コンテキストメニューから検証を選びます。デベロッパーツールウィンドウが立ち上がり、その部分に対応するHTMLが表示されます。図13-4は直近の予報のHTMLを示しています。https://
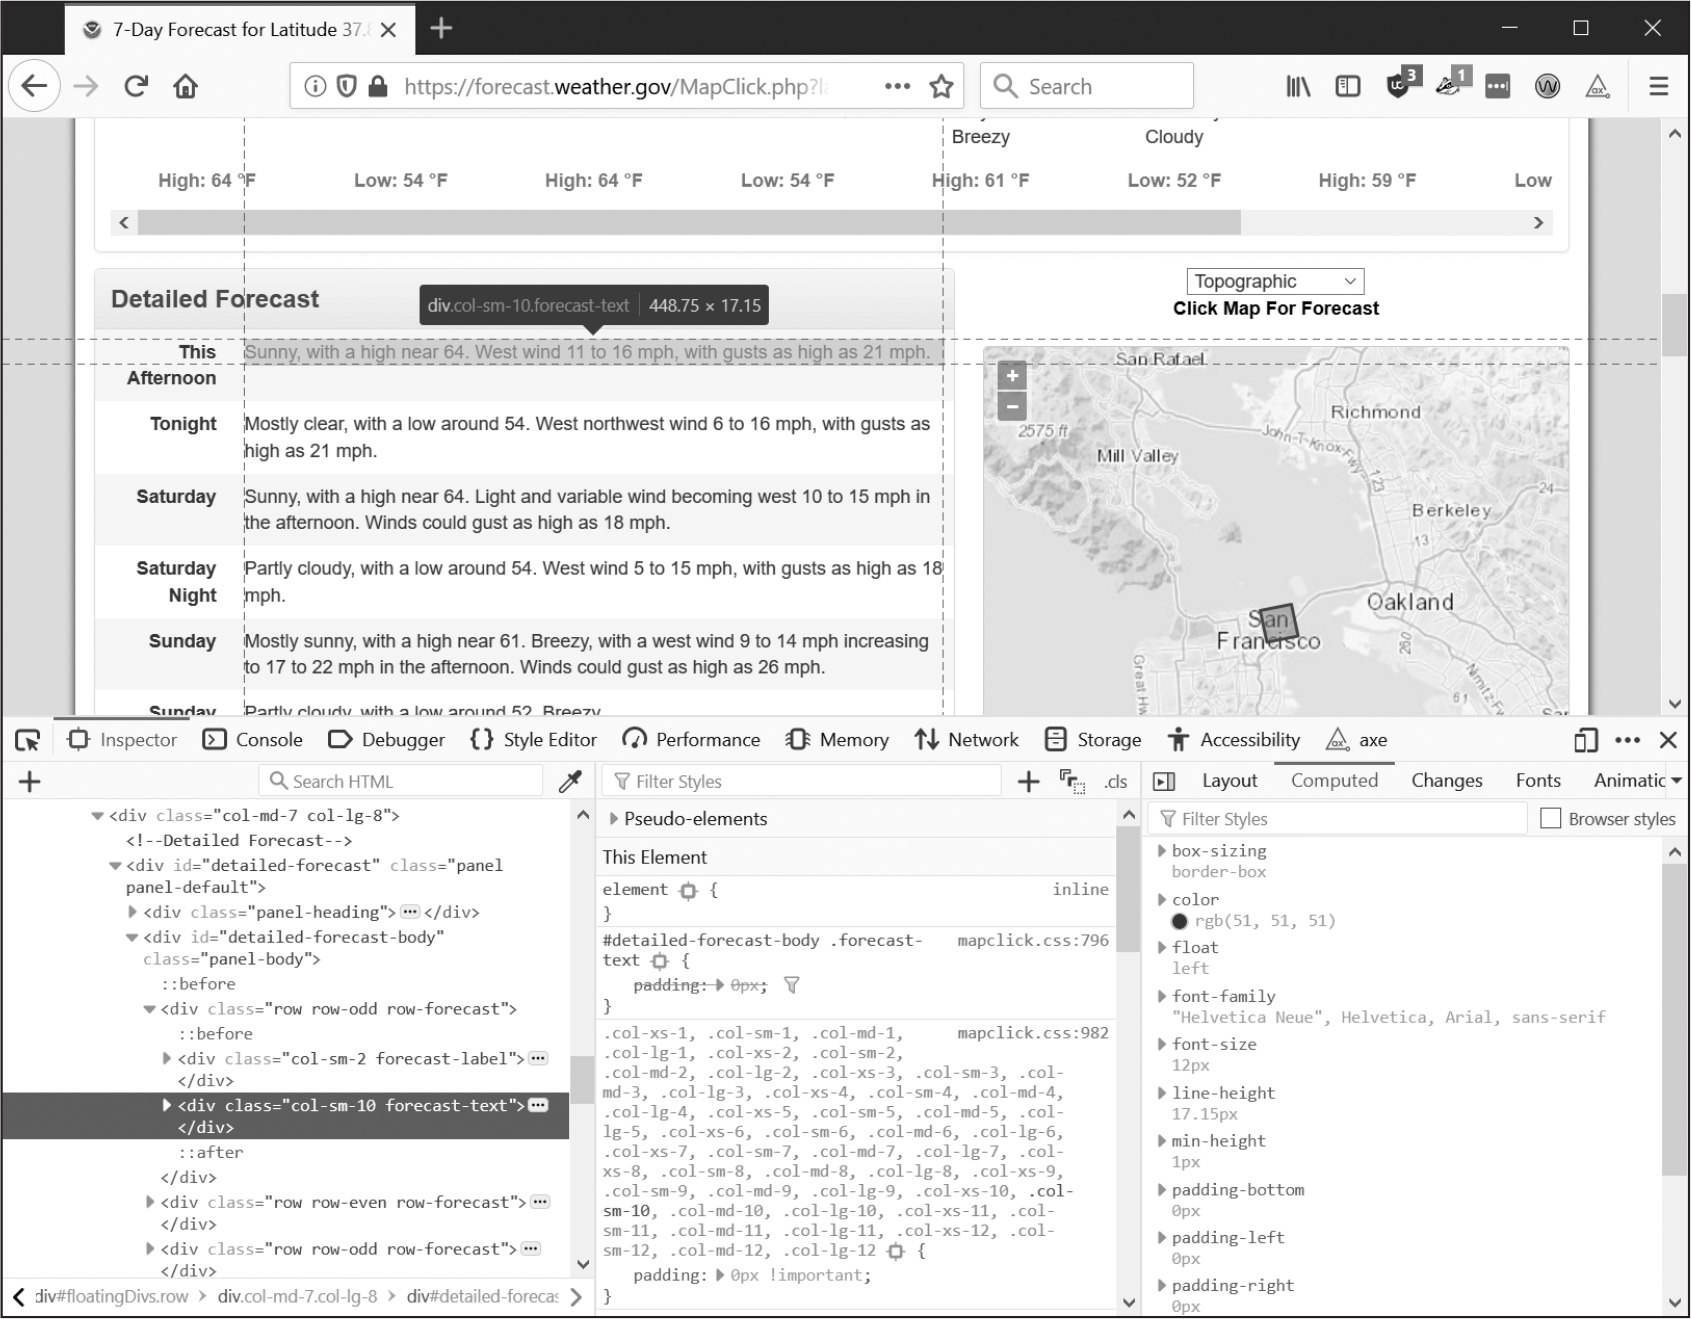
図 13-4:予報テキストに対応する要素を見つける
デベロッパーツールから、そのウェブページの天気予報の部分に対応するHTMLは、以下のものであることがわかります。
<div class="col-sm-10 forecast-text">Sunny, with a high near 64.
West wind 11 to 16 mph, with gusts as high as 21 mph.</div>
これがほしかった情報です。天気予報の情報はforecast-textCSSクラスの<div>要素の中にあります。
ブラウザのディベロッパーコンソールのこの要素を右クリックして、コンテキストメニューからCopyCopy Selectorを選びます。これで'div.row-odd:nth-child(1) > div:nth-child(2)'のような文字列がクリップボードにコピーされます。あとで説明するように、それをBeautiful Soupのselect()メソッドや、Seleniumのfind_element()メソッドに渡せば、要素を見つけられます。
この文字列で用いられているCSSセレクタ構文により、ウェブページから取得するHTML要素を指定します。セレクタ構文を詳しく説明するのは本書の範囲外ですが、ここで示したようにブラウザのデベロッパーツールからセレクタを取得できます。HTML要素を指定するXPathという別の構文もありますが、これも本書の範囲外です。
ウェブサイトがレイアウトを変更したら、スクリプトが扱うHTMLタグにも変更の必要が生じるでしょう。こうした事態は警告なしに発生しますから、要素を見つけられないというエラーが発生していないかプログラムを注視してください。一般に、APIが提供されているならAPIを使うほうが望ましいです。ウェブサイトよりも変更される可能性はずっと低いです。
Beautiful SoupでHTMLを解析する
Beautiful SoupはHTMLページから情報を抽出するためのパッケージです。パッケージをインストールするときにはbeautifulsoup4という名前を使いますが、インポートするモジュール名はbs4です。この節では、Beautiful Soupで以下の内容のHTMLファイル(https://
<!-- This is an HTML comment. -->

<html>
<head>
    <title>Example Website Title</title>
    <style>
        .slogan {
            color: gray;
            font-size: 2em;
        }
    </style>
</head>
<body>
    <h1>Example Website</h1>
    <p>This <p> tag puts <b>content</b> into a <i>single</i> paragraph.</p>
    <p><a href="https://inventwithpython.com”>This text is a link</a> to books by <span id=
"author">Al Sweigart</span>.</p>
    <p><img src="wow_such_zophie_thumb.webp" alt="Close-up of my cat Zophie." /></p>
    <p class="slogan">Learn to program in Python!</p>
    <form>
        <p><label>Username: <input id="login_user" placeholder="admin" /></label></p>
        <p><label>Password: <input id="login_pass" type="password" placeholder="swordfish" />
    </form>
</label></p>
    <p><label>Agree to disagree: <input type="checkbox" /></label><input type="submit"
value="Fake Button" /></p>
</body>
</html>
このページのログインフォームは見た目のためのもので動作しません。
シンプルなHTMLファイルでもいろいろなタグと属性があり、複雑なウェブサイトになるとすぐにとてもややこしくなります。ありがたいことに、Beautiful SoupはHTMLを扱いやすくしてくれます。
Beautiful Soupオブジェクトを作成する
bs4.BeautifulSoup()関数は解析対象のHTMLを含む文字列を取り、BeautifulSoupオブジェクトを返します。例えば、インターネットに接続しているコンピュータで、以下の内容を対話型シェルに入力してください。
>>> import requests, bs4
>>> res = requests.get('https://autbor.com/example3.html')
>>> res.raise_for_status()
>>> example_soup = bs4.BeautifulSoup(res.text, 'html.parser')
>>> type(example_soup)
<class 'bs4.BeautifulSoup'>
このコードでは、requests.get()でAutomate the Boring Stuffウェブサイトのメインページをダウンロードし、レスポンスのtext属性をbs4.BeautifulSoup()に渡しています。Beautiful Soupはさまざまなフォーマットを解析できますが、'html.parser'を引数にするとHTMLを解析します。最後に、返されたBeautifulSoupオブジェクトをexample_soupという名前の変数に格納しています。
bs4.BeautifulSoup()にFileオブジェクトを渡せばハードドライブ上のHTMLファイルを読み込めます。(example3.htmlファイルが現在の作業ディレクトリにあることを確認してから)対話型シェルに以下の内容を入力してください。
>>> import bs4
>>> with open('example3.html') as example_file:
...     example_soup = bs4.BeautifulSoup(example_file, 'html.parser')
...
>>> type(example_soup)
<class 'bs4.BeautifulSoup'>
BeautifulSoupオブジェクトを取得したら、メソッドを使ってHTML文書の特定の部分を見つけることができます。
要素を見つける
BeautifulSoupオブジェクトからウェブページの要素を取得するには、select()メソッドを呼び出して目的の要素を表すCSSセレクタ文字列を渡します。このメソッドの返り値は、マッチしたHTML要素を表すTagオブジェクトです。表13-2は、select()で使う一般的なCSSセレクタのパターン例を示しています。
select()メソッドに渡されるセレクタ |
マッチ対象 |
|---|---|
soup.select('div') |
すべての<div>要素 |
soup.select('#author') |
id属性がauthorである要素 |
soup.select('.notice') |
class属性が noticeである要素 |
soup.select('div span') |
<div>要素内の<span>要素 |
soup.select('div > span') |
<div>要素内で直下の <span>要素 |
soup.select('input[name]') |
name属性を持つ<input>要素 |
soup.select('input[type="button"]') |
type属性の値がbuttonである<input>要素 |
細かくマッチさせるためにセレクタのパターンを組み合わせることができます。例えば、soup.select('p #author')は<p>要素内でid属性がauthorであるものにマッチします。
タグ値をstr()関数に渡すとHTMLタグを見ることができます。タグ値にはattrs属性があり、HTML属性を辞書として含んでいます。例えば、https://
>>> import bs4
>>> example_file = open('example3.html')
>>> example_soup = bs4.BeautifulSoup(example_file.read(), 'html.parser')
>>> elems = example_soup.select('#author')
>>> type(elems) # elemsはTagオブジェクトのリスト
<class 'bs4.element.ResultSet'>
>>> len(elems)
1
>>> type(elems[0])
<class 'bs4.element.Tag'>
>>> str(elems[0])  # Tagオブジェクトを文字列に
'<span id="author">Al Sweigart</span>'
>>> elems[0].get_text()  # 要素内のテキスト
'Al Sweigart'
>>> elems[0].attrs
{'id': 'author'}
このコードは、先の例のHTMLからid="author"の要素を見つけます。select('#author')はid="author"の要素すべてをリストで返します。そのTagオブジェクトのリストを変数elemsに格納します。len(elems)を実行すると(1と表示されたので)、リスト中にはTagオブジェクトが一つあることがわかります。マッチしたのは1件です。
この要素をstr()に渡すと開始タグと終了タグに囲まれたテキスト文字列が返ります。この要素のget_text()を呼び出すと、その要素のテキスト、この例では'Al Sweigart'が返ります。attrsにはその要素の属性が辞書として保存されており、'id'とそのid属性の値である'author'があります。
BeautifulSoupオブジェクトから<p>要素をすべて取得することもできます。以下の内容を対話型シェルに入力してください。
>>> p_elems = example_soup.select('p')
>>> str(p_elems[0])
'<p>This <p> tag puts <b>content</b> into a <i>single</i> paragraph.</p>'
>>> p_elems[0].get_text()
'This <p> tag puts content into a single paragraph.'
>>> str(p_elems[1])
'<p> <a href="https://inventwithpython.com/”>This text is a link</a> to books by
<span id="author">Al Sweigart</span>.</p>'
>>> p_elems[1].get_text()
'This text is a link to books by Al Sweigart.'
>>> str(p_elems[2])
'<p><img alt="Close-up of my cat Zophie." src="wow_such_zophie_thumb.webp"/></p>'
>>> p_elems[2].get_text()
''
今回はselect()が3件マッチしました。その結果をp_elemsに格納します。p_elems[0]、p_elems[1]、p_elems[2]にstr()を適用すると各要素の文字列が示され、各要素のget_text()を使うとテキストが示されます。
要素の属性からデータを取得する
Tagオブジェクトのget()メソッドではHTML要素の属性の値にアクセスできます。このメソッドに属性名を文字列で渡すと、その属性の値を取得できます。https://
>>> import bs4
>>> soup = bs4.BeautifulSoup(open('example3.html'), 'html.parser')
>>> span_elem = soup.select('span')[0]
>>> str(span_elem)
'<span id="author">Al Sweigart</span>'
>>> span_elem.get('id')
'author'
>>> span_elem.get('some_nonexistent_addr') == None
True
>>> span_elem.attrs
{'id': 'author'}
select()で<span>要素をすべて探し、最初にマッチした要素をspan_elemに格納しています。get()に属性名'id'を渡すと、その属性の値である'author'が返されます。
プロジェクト7:検索結果をすべて開く
私は検索エンジンで調べ物をするときに、複数の検索結果を確認します。検索結果のリンクを中クリックして(あるいはCTRLを押しながらクリックして)、複数のリンクを新しいタブで開いてからそれらを読みます。インターネットで調べ物をすることはしょっちゅうですから、ブラウザを開いて、検索して、検索結果を一つずつ中クリックして、というこの作業フローが面倒です。コマンドラインで検索ワードを入力すれば自動的に検索結果を新しいブラウザのタブで開けるとしたら、素晴らしいことです。
https://
このプログラムには以下の内容が必要です。
- コマンドライン引数から検索ワードを取得する
- 検索結果ページを取得する
- 結果ごとにブラウザのタブを開く
コードには以下の内容が必要になります。
- sys.argvからコマンドライン引数を読み取る
- requestsモジュールで検索ページを取得する
- 検索結果の各リンクを見つける
- webbrowser.open()関数を呼び出してウェブブラウザを開く
新しいファイルエディタタブを開いて、searchpypi.pyという名前で保存します。
ステップ1:検索ページを取得する
コードを書く前に、検索結果ページのURLを知る必要があります。検索実行後にブラウザのアドレスバーを見ると、結果のページはhttps://
コードは次のようになります。
# searchpypi.py - pypi.orgの複数の検索結果を開く

import requests, sys, webbrowser, bs4

print('Searching...')  # 検索結果ページのダウンロード中にテキストを表示
res = requests.get('https://pypi.org/search/?q=' + ' '.join(sys.argv[1:]))
res.raise_for_status()

# TODO: 検索結果上位のリンクを取得

# TODO: 結果ごとにブラウザのタブを開く
ユーザーはコマンドライン引数で検索ワードを指定してプログラムを実行します。そのコマンドライン引数は、sys.argvのリスト内に文字列として格納されています。
ステップ2:すべての結果を見つける
Beautiful Soupを使って、ダウンロードしたHTMLから検索結果上位のリンクを抽出します。どのようにしてセレクタを指定すればよいでしょうか。例えば、単にすべての<a>タグを探すと、不要なリンクが混じってしまいます。そうではなく、検索結果ページをブラウザのデベロッパーツールで精査し、必要なリンクだけを選べるようなセレクタを見つけ出します。
pyautoguiを検索して、ブラウザのデベロッパーツールを開いてそのページのリンクをいくつか調べます。複雑に見えますが、<a class="package-snippet" href="/project/pyautogui" >のようなものがそれです。要素が非常に込み入っていても落ち着いてください。検索結果のリンクが共通に持っているパターンを見つければよいのです。
コードは次のようになります。
# searchpypi.py - pypi.orgの複数の検索結果を開く
import requests, sys, webbrowser, bs4
--snip--
# 検索結果上位のリンクを取得
soup = bs4.BeautifulSoup(res.text, 'html.parser')
# 結果ごとにブラウザのタブを開く
link_elems = soup.select('.package-snippet')
<a>要素を見ると、検索結果のリンクはすべてclass="package-snippet"を共通に持っていることがわかります。HTMLソースの残りの部分を見ると、package-snippetクラスは検索結果のリンクにしか使われていないようです。CSSのpackage-snippetクラスが何であり、どういう働きをしているかを知る必要はありません。探している<a>要素の印として使うのみです。
ダウンロードしたページのHTMLテキストからBeautifulSoupオブジェクトを作成し、'.package-snippet'というセレクタを使ってCSSクラスpackage-snippetを持つすべての<a>要素を見つけます。PyPIウェブサイトがレイアウトを変更したら、新しいCSSセレクタ文字列をsoup.select()に渡すように、このプログラムを変更しなければならないかもしれません。プログラムの残りの部分は変更不要なはずです。
ステップ3:結果ごとにウェブブラウザを開く
最後に、その検索結果について、プログラムでウェブブラウザのタブを開く指示を出します。以下の内容をプログラムの末尾に追加してください。
# searchpypi.py - pypi.orgの複数の検索結果を開く
import requests, sys, webbrowser, bs4
--snip--
# 結果ごとにブラウザのタブを開く
link_elems = soup.select('.package-snippet')
num_open = min(5, len(link_elems))
for i in range(num_open):
    url_to_open = 'https://pypi.org' + link_elems[i].get('href')
    print('Opening', url_to_open)
    webbrowser.open(url_to_open)
このプログラムは、デフォルトで、検索結果のうち最初の5つの結果をwebbrowserモジュールを使って新しいタブで開きます。しかし、検索結果が5件よりも少ない場合もあります。soup.select()を呼び出すと'.package-snippet'セレクタにマッチしたすべての要素のリストが返されるので、開くタブの数は5かこのリストの要素数のいずれか小さいほうです。
Pythonの組み込み関数min()は、渡された整数または浮動小数点数の中で最も小さいものを返します。(渡された引数の中で最も大きいものを返す組み込み関数のmax()もあります。)min()を使ってリスト中のリンクが5よりも少ないかどうかを判断し、タブを開くリンクの数をnum_openという名前の変数に格納します。range(num_open)でforループを反復します。
ループの反復ごとに、webbrowser.open()でウェブブラウザの新しいタブを開きます。返される<a>要素のhref属性の値には最初のhttps://
これで例えばコマンドラインからsearchpypi boring stuffと実行すると、PyPIのboring stuffの検索結果から最初の5件をすぐに開くことができます。お使いのOSでプログラムを簡単に実行する方法につきましては、第12章をご参照ください。
似たようなプログラムのアイデア
ウェブブラウザでタブを使うと、新しいタブでリンクを開き、あとでゆっくり読むことができます。一度で複数のリンクを自動的に開くプログラムがあれば、以下のような作業を短縮できます。
- Amazonなどのショッピングサイトを検索して商品ページをすべて開く
- 一つの商品についてのレビューリンクをすべて開く
- FlickrやImgurのような写真サイトで検索を実行してから検索結果の写真のリンクを開く
プロジェクト8:XKCDコミックをダウンロードする
ブログ、ウェブコミック、その他の定期的に更新されるウェブサイトでは、たいてい、最初のページに最新の投稿が表示され、ボタンをクリックすると以前の投稿を遡って見ることができます。どんどん昔に遡ることができ、最新の投稿から一直線に並べられます。オフラインで読めるようにサイトのコンテンツをコピーしたければ、手動で1ページずつ移動しながら保存できます。しかしこれは退屈な作業ですから、プログラムを書きましょう。
図13-5に示したXKCDは、先に述べたような構造をした、人気のある技術オタクのウェブコミックです。最初のページはhttps://

図 13-5:XKCD, “a webcomic of romance, sarcasm, math, and language”
このプログラムには以下の内容が必要です。
- XKCDのホームページを読み込む
- そのページのコミック画像を保存する
- 過去のコミックをリンクでたどる
- 最初のコミックまで遡るかダウンロードの上限に達するまで繰り返す
コードには以下の内容が必要になります。
- requestsモジュールでページをダウンロードする
- Beautiful Soupを使ってそのページのコミック画像のURLを見つける
- iter_content()でそのコミック画像をダウンロードしてハードドライブ上に保存する
- 過去のコミックへのリンクURLを見つけ、動作を繰り返す
新しいファイルエディタタブを開いて、downloadXkcdComics.pyという名前で保存します。
ステップ1:プログラムを設計する
ブラウザのデベロッパーツールを開いてページの要素を調べると、以下の事実を発見するはずです。
- <img>要素のsrc属性にコミックの画像ファイルURLがある
- <img>要素は<div id="comic">要素内にある
- PrevボタンにはrelというHTML属性があり、その値はprev
- 一番古いコミックのPrevボタンのリンクはhttps://
xkcd .com /#というURLで、これ以上前のページはない
本書の読者がコードを実行してXKCDウェブサイトの帯域幅を使い過ぎてしまわないように、デフォルトで最大ダウンロード数を10に制限します。コードは次のようになります。
# downloadXkcdComics.py - XKCDコミックのダウンロード

import requests, os, bs4, time

url = 'https://xkcd.com'  # 開始URL
os.makedirs('xkcd', exist_ok=True)  # コミックを./xkcdに保存
num_downloads = 0
MAX_DOWNLOADS = 10
while not url.endswith('#') and num_downloads < MAX_DOWNLOADS:
    # TODO: ページをダウンロード

    # TODO: コミック画像のURLを見つける

    # TODO: 画像をダウンロード

    # TODO: 画像を./xkcdに保存

    # TODO: PrevボタンのURLを取得

print('Done.')
このプログラムでは、変数urlを'https://xkcd.com'という値で始めて、現在のページのPrevリンクのURLに(whileループ内で)更新していきます。ループの各ステップでは、urlからコミックをダウンロードします。urlが'#'で終わるかMAX_DOWNLOADS回コミックをダウンロードしたらループは終了します。
現在の作業ディレクトリ内のxkcdという名前のフォルダに画像ファイルをダウンロードします。os.makedirs()を呼び出して確実にそのフォルダが存在するようにし、exist_ok=Trueキーワード引数を指定してそのフォルダがすでに存在しても例外を送出しないようにします。
ステップ2:ウェブページをダウンロードする
ページをダウンロードするコードを実装しましょう。コードは次のようになります。
# downloadXkcdComics.py - XKCDコミックのダウンロード

import requests, os, bs4, time

url = 'https://xkcd.com'  # 開始URL
os.makedirs('xkcd', exist_ok=True)  #  コミックを./xkcdに保存
num_downloads = 0
MAX_DOWNLOADS = 10
while not url.endswith('#') and num_downloads < MAX_DOWNLOADS:
    # ページをダウンロード
    print(f'Downloading page {url}...')
    res = requests.get(url)
    res.raise_for_status()

    soup = bs4.BeautifulSoup(res.text, 'html.parser')

    # TODO: コミック画像のURLを見つける

    # TODO: 画像をダウンロード

    # TODO: 画像を./xkcdに保存

    # TODO: PrevボタンのURLを取得

print('Done.')
まず、どのURLをダウンロードしようとしているかユーザーにわかるように、urlを表示します。次に、requestsモジュールのrequests.get()関数を使ってそのURLをダウンロードします。いつもの要領で、Responseオブジェクトのraise_for_status()メソッドを呼び出し、ダウンロードに不具合があれば例外を送出してプログラムを終了します。ダウンロードが成功すれば、ダウンロードしたページのテキストからBeautifulSoupオブジェクトを作成します。
ステップ3:コミック画像を見つけてダウンロードする
各ページのコミックをダウンロードするコードは次のようになります。
# downloadXkcdComics.py - XKCDコミックのダウンロード

import requests, os, bs4, time

--snip--

    # コミック画像のURLを見つける
    comic_elem = soup.select('#comic img')
    if comic_elem == []:
        print('Could not find comic image.')
    else:
        comic_URL = 'https:' + comic_elem[0].get('src')
        # 画像をダウンロード
        print(f'Downloading image {comic_URL}...')
        res = requests.get(comic_URL)
        res.raise_for_status()

    # TODO: 画像を./xkcdに保存

    # TODO: PrevボタンのURLを取得

print('Done.')
XKCDホームページをデベロッパーツールで調べて、コミック画像の<img>要素はid属性がcomicである要素内にあることがわかっています。よって、セレクタ'#comic img'によりBeautifulSoupオブジェクトから正しい<img>要素を取得できます。
XKCDページの中には、単純な画像ファイルではない特別なコンテンツがあるページが少数あります。そのようなページはスキップしましょう。先ほどのセレクタで要素を見つけることができなければ、soup.select('#comic img')は空リストのResultSetオブジェクトを返します。その場合、プログラムはエラーメッセージを表示し、画像をダウンロードせずに次に進みます。
要素を見つけることができれば、<img>要素を一つ含むリストを返します。この<img>要素のsrc属性を取得し、それをrequests .get()に渡せば、コミックの画像ファイルをダウンロードできます。
ステップ4:画像を保存して前のコミックを見つける
ここまでで、コミックの画像ファイルが変数resに格納されます。この画像データをハードドライブ上のファイルに書き込みます。コードは次のようになります。
# downloadXkcdComics.py - XKCDコミックのダウンロード

import requests, os, bs4, time

--snip--

    # 画像を./xkcdに保存
        image_file = open(os.path.join('xkcd', os.path.basename(comic_URL)), 'wb')
            for chunk in res.iter_content(100000):
               image_file.write(chunk)
            image_file.close()

    # PrevボタンのURLを取得
      prev_link = soup.select('a[rel="prev"]')[0]
      url = 'https://xkcd.com' + prev_link.get('href')
      num_downloads += 1
      time.sleep(1)  # ウェブサーバーに負荷をかけすぎないように待機

print('Done.')
open()に渡す画像ファイルの名前が必要です。comic_URLは'https://imgs.xkcd.com/comics/heartbleed_explanation.png'のような値であり、ファイルパスに似ています。実際に、comic_URLについてos.path.basename()を呼び出すと、'heartbleed_explanation.png'のようなURLの最後の部分だけが返されます。これを画像をハードドライブ上に保存するときのファイル名として利用します。os.path.join()を使ってこの名前をxkcdフォルダの名前と連結します。そうすれば、Windowsではバックスラッシュ(\)、macOSとLinuxではスラッシュ(/)でつないでくれます。これでファイル名が用意できましたから、open()を呼び出して新しいファイルを'wb'モードで開きます。
本章の最初のほうで説明したように、requestsでダウンロードしたファイルを保存するには、iter_content()メソッドの返り値をループで反復処理します。forループ内のコードで画像データのチャンクをファイルに書き込みます。それから、ファイルを閉じ、画像をハードドライブ上に保存します。
それから、セレクタ'a[rel="prev"]'により、rel属性の値がprevである<a>要素を特定します。この<a>要素のhref属性を使って前のコミックのURLを取得でき、それをurlに格納します。
ループのコードの最後の部分では、デフォルトでコミックをすべてダウンロードしないように、num_downloadsを1ずつ増やしています。また、スクリプトがサイトに高頻度でアクセスしないように、time.sleep(1)で1秒待機しています。(コミックを最大速度でダウンロードすると、他のサイト閲覧者のパフォーマンス問題を引き起こす可能性があります。)それから、whileループがダウンロードをもう一度開始します。
このプログラムの出力は次のようになります。
Downloading page https://xkcd.com...
Downloading image https://imgs.xkcd.com/comics/phone_alarm.png...
Downloading page https://xkcd.com/1358/...
Downloading image https://imgs.xkcd.com/comics/nro.png...
Downloading page https://xkcd.com/1357/...
Downloading image https://imgs.xkcd.com/comics/free_speech.png...
Downloading page https://xkcd.com/1356/...
Downloading image https://imgs.xkcd.com/comics/orbital_mechanics.png...
Downloading page https://xkcd.com/1355/...
Downloading image https://imgs.xkcd.com/comics/airplane_message.png...
Downloading page https://xkcd.com/1354/...
Downloading image https://imgs.xkcd.com/comics/heartbleed_explanation.png...
--snip--
このプログラムは、リンクをたどって自動的にウェブから大量のデータをスクレイピングするプログラムの好例です。Beautiful Soupの他の機能についてはhttps://
似たようなプログラムのアイデア
ウェブをクロールするプログラムでは、ページをダウンロードしてリンクをたどることが多いです。以下のような内容が考えられます。
- すべてのリンクをたどりサイトを丸ごとバックアップする
- ウェブフォーラムのメッセージをすべてコピーする
- オンラインストアの販売商品カタログを複製する
requests.get()に渡すURLがわかるのであれば、requestsモジュールとbs4モジュールが大いに役立ちます。しかし、URLがいつもそれほど簡単に見つけられるとは限りません。あるいは、対象とするウェブサイトでは最初にログインしなければならないかもしれません。Seleniumを使えばそうした高度な作業を行う力を得られます。
Seleniumでブラウザを制御する
Seleniumでは、人間がリンクをクリックしたりフォームを入力したりするのと同じことをプログラムで行うことができ、Pythonが直接ブラウザを制御できます。Seleniumを使うと、requestsやBeautiful Soupよりも高度な方法でウェブページとやり取りできます。他方でSeleniumはウェブブラウザを立ち上げますから、ウェブからファイルをダウンロードするだけであっても、少し遅く、バッググラウンドで実行するのは難しいです。
それでも、例えばJavaScriptのコードがページを更新するようなウェブサイトとやり取りするためには、requestsではなくSeleniumが必要になります。AmazonのようなEコマースの大手は、スクリプトが情報を集めようとしたり多数のアカウントを作成しようとしているのを検知するソフトウェアシステムを導入しています。これらのサイトでは、スクリプトが検知されると、一定の間ページが表示されなくなり、スクリプトが機能しなくなります。これらのサイトでは、Seleniumのほうがrequestsよりもうまく動作する可能性がはるかに高いです。
スクリプトがウェブサイトにアクセスしているのだとわかる主な印は、ユーザーエージェント文字列です。これはHTTPリクエストに含まれる、ウェブブラウザを識別する文字列です。例えば、requestsモジュールのユーザーエージェント文字列は'python-requests/X.XX.X'のようになります。https://
Seleniumで制御されたブラウザを立ち上げる
以下の例ではFirefoxウェブブラウザを制御する方法を示します。Firefoxがなければhttps://
Seleniumのモジュールのインポートは少しややこしいです。import seleniumではなくfrom selenium import webdriverとしなければなりません(その理由の正確な説明は本書の範囲外です)。そうすると、SeleniumでFirefoxを立ち上げられます。以下の式を対話型シェルに入力してみてください。
>>> from selenium import webdriver
>>> browser = webdriver.Firefox()
>>> type(browser)
<class 'selenium.webdriver.firefox.webdriver.WebDriver'>
>>> browser.get('https://inventwithpython.com')
webdriver.Firefox()を呼び出すと、Firefoxウェブブラウザが起動します。webdriver.Firefox()の値についてtype()を呼び出すと、WebDriverデータ型であることがわかります。browser.get('https://inventwithpython.com')を呼び出すと、ブラウザがhttps://
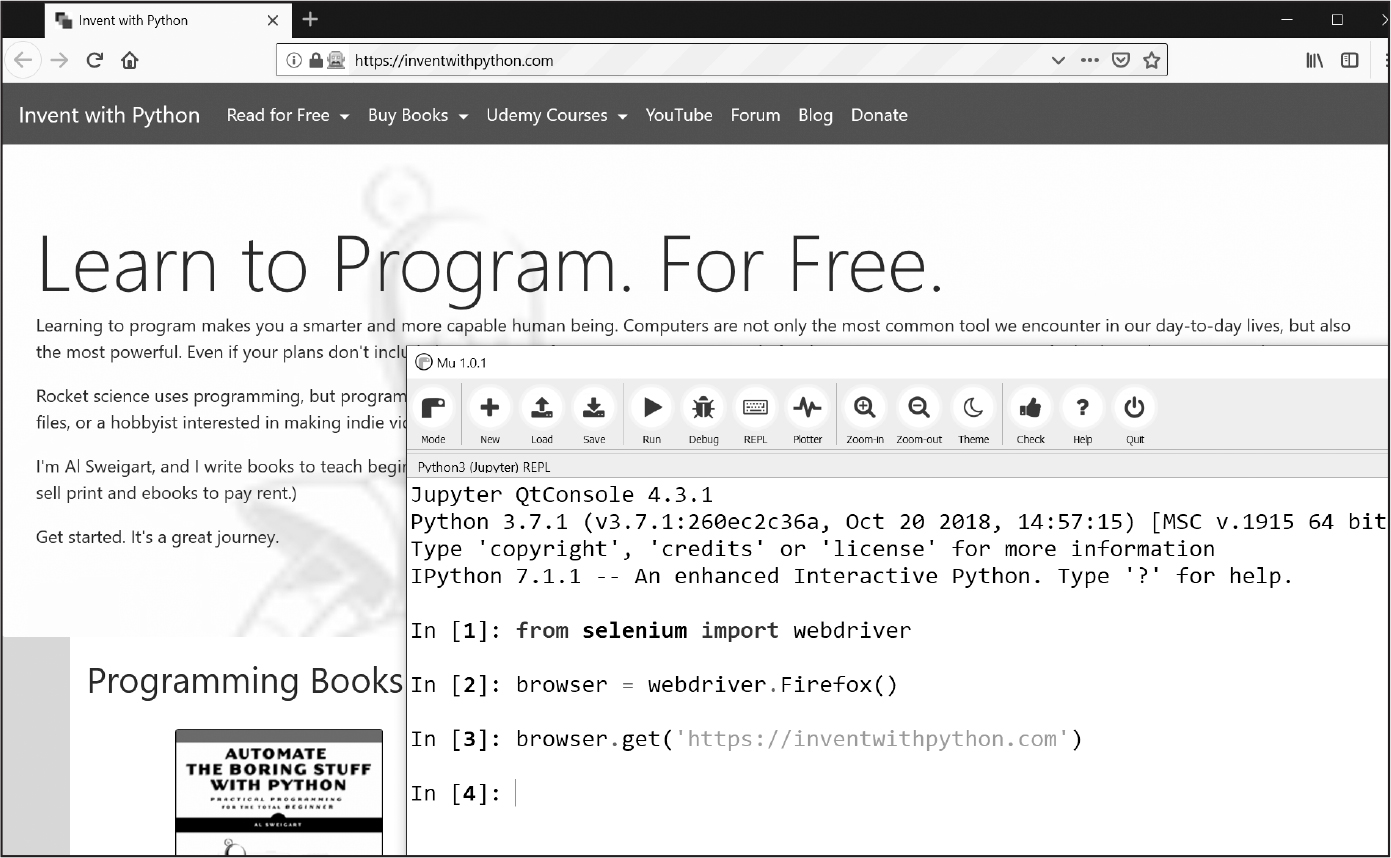
図 13-6:webdriver.Firefox()とget()をMuで呼び出したあとのFirefoxブラウザの状態
“geckodriver executable needs to be in PATH”というエラーメッセージが表示されたら、Seleniumで制御できるように、Firefoxのウェブドライバを手動でダウンロードする必要があります。ウェブドライバをインストールすればFirefox以外のブラウザも制御できます。手動でウェブドライバをインストールしなくても、https://
ブラウザのボタンをクリックする
Seleniumでは、以下のメソッドで、ブラウザの各種ボタンのクリックをシミュレートできます。
browser.back() 戻るボタンのクリック
browser.forward() 進むボタンのクリック
browser.refresh() 更新ボタンのクリック
browser.quit() ウィンドウを閉じるボタンのクリック
ページの要素を見つける
WebDriverオブジェクトには、ウェブページの要素を見つけるためのfind_element()メソッドとfind_elements()メソッドがあります。find_element()メソッドは、そのページでクエリにマッチする最初の要素を表す、一つのWebElementオブジェクトを返します。find_elements()メソッドは、そのページでマッチするすべての要素のWebElementオブジェクトのリストを返します。
クラス名、CSSセレクタ、IDその他の手段で要素を探せます。最初にfrom selenium.webdriver.common.by import Byを実行して、Byオブジェクトを取得してください。Byオブジェクトは、find_element()メソッドとfind_elements()メソッドに渡すことのできる定数を持っています。表13-3でその定数を一覧にまとめました。
定数名 |
返されるWebElementオブジェクト/リスト |
|---|---|
By.CLASS_NAME |
指定したCSSクラス名の要素 |
By.CSS_SELECTOR |
指定したCSSセレクタの要素 |
By.ID |
指定したidの値の要素 |
By.LINK_TEXT |
指定したテキストに完全一致する<a>要素 |
By.PARTIAL_LINK_TEXT |
指定したテキストを含む<a>要素 |
By.NAME |
指定したname属性の値の要素 |
By.TAG_NAME |
指定したタグの要素(大文字と小文字を区別しないので'a'でも'A'でも<a>にマッチします) |
そのページにマッチする要素が存在しなければ、NoSuchElement例外が送出されます。この例外によりプログラムをクラッシュさせたくなければ、try文とexcept文で処理してください。
WebElementオブジェクトを取得したら、表13-4の属性やメソッドからその要素についての情報が得られます。
属性またはメソッド |
|
|---|---|
tag_name |
<a>要素では'a'のようなタグ名 |
get_attribute(name) |
<a>要素のhref のようにその要素の属性名を指定したときのその属性の値 |
get_property(name) |
innerHTMLや innerTextなどHTMLコードに現れない要素のプロパティの値 |
text |
<span>hello</span>では'hello'のような要素内のテキスト |
clear() |
テキストフィールドやテキストエリアの要素で入力されたテキストを消去する |
is_displayed() |
要素が見える状態ならTrueを返し、見えない状態ならFalseを返す |
is_enabled() |
input要素が有効ならTrueを返し、無効ならFalseを返す |
is_selected() |
チェックボックスやラジオボタンの要素で選択された状態ならTrueを返し、選択されていない状態ならFalseを返す |
location |
ページ内でその要素の位置を表す 'x'と'y'のキーを持つ辞書 |
size |
ページ内でその要素のサイズを表す'width'と'height'のキーを持つ辞書 |
例えば、新しいファイルエディタのタブを開いて、次のプログラムを入力してください。
from selenium import webdriver
from selenium.webdriver.common.by import By
browser = webdriver.Firefox()
browser.get('https://autbor.com/example3.html')
elems = browser.find_elements(By.CSS_SELECTOR, 'p')
print(elems[0].text)
print(elems[0].get_property('innerHTML'))
Firefoxを開いて指定したURLに移動します。このページで<p>要素のリストを取得し、インデックス0でその最初の要素の<p>要素内のテキストを取得します。次にinnerHTMLプロパティの文字列を取得します。このプログラムを実行すると、次のように出力されます。
This <p> tag puts content into a single paragraph.
This <p> tag puts <b>content</b> into a <i>single</i> paragraph.
要素のtext属性はウェブブラウザで見ているテキスト“This <p> tag puts content into a single paragraph.”です。要素のinnerHTMLプロパティをget_property()メソッドを呼び出して調べると、タグとHTMLエンティティ(<と>は小なり記号と大なり記号を表すHTMLエスケープ文字です)を含むHTMLのソースコードになっています。
text属性はget_property('innerText')を呼び出すのと同じ意味のショートカットです。innerHTMLとinnerTextは、HTML要素のプロパティの標準の名前です。こうしたHTML要素のプロパティはJavaScriptのコードやウェブドライバでアクセスされるものであるのに対し、<a href="https://inventwithpython.com">のようなHTML要素のhref 属性はHTMLソースコードの一部です。
ページの要素をクリックする
find_element()メソッド及びfind_elements()メソッドから返されるWebElementオブジェクトには、その要素のクリックをシミュレートするclick()メソッドがあります。このメソッドを使うと、リンクをクリックしてたどったり、ラジオボタンの選択をしたり、送信ボタンのクリックをしたり、その他マウスで要素をクリックしたら起こることを何でもシミュレートできます。対話型シェルで次のように入力してみてください。
>>> from selenium import webdriver
>>> from selenium.webdriver.common.by import By
>>> browser = webdriver.Firefox()
>>> browser.get('https://autbor.com/example3.html')
>>> link_elem = browser.find_element(By.LINK_TEXT, 'This text is a link')
>>> type(link_elem)
<class 'selenium.webdriver.remote.webelement.WebElement'>
>>> link_elem.click()  # "This text is a link"リンクをたどる
このコードはFirefoxを開いてhttps://
フォームに入力して送信する
ウェブページ上のテキストフィールドへの入力は、テキストフィールドの<input>要素ないし<textarea>要素を見つけて、send_keys()メソッドを呼び出すという方法で行います。対話型シェルで次のように入力してみてください。
>>> from selenium import webdriver
>>> from selenium.webdriver.common.by import By
>>> browser = webdriver.Firefox()
>>> browser.get('https://autbor.com/example3.html')
>>> user_elem = browser.find_element(By.ID, 'login_user')
>>> user_elem.send_keys('your_real_username_here')
>>> password_elem = browser.find_element(By.ID, 'login_pass')
>>> password_elem.send_keys('your_real_password_here')
>>> password_elem.submit()
ログインページのユーザー名とパスワードの<input>要素のidが変更されない限り、このコードはそれらのテキストフィールドを見つけます(ブラウザの検証を活用して対象となるidを検証できます)。フォーム内の任意の要素についてsubmit()メソッドを呼び出すと、そのフォームの送信ボタンをクリックするのと同じ結果を得られます(user_elem.submit()を呼び出してもpassword_elem.submit()を呼び出すのと同じです)。
警告
できるだけパスワードをソースコードに書かないようにしてください。暗号化しないでいると誤ってパスワードが流出する事態につながりやすいです。
特別なキーを入力する
Seleniumにはselenium.webdriver.common.keysというモジュールがあり、その属性でキーボードのキーを表せます。このモジュール名は長いですから、プログラムの冒頭でfrom selenium.webdriver.common.keys import Keysを実行しておくと、selenium.webdriver.common.keysと書かなければならないところでKeysと短く書けます。
以下の定数をsend_keys()に渡せます。
Keys.ENTER  Keys.PAGE_UP       Keys.DOWN
Keys.RETURN  Keys.ESCAPE        Keys.LEFT
Keys.HOME    Keys.BACK_SPACE    Keys.RIGHT
Keys.END     Keys.DELETE        Keys.TAB
Keys.PAGE_DOWN   Keys.UP        Keys.F1 to Keys.F12
'hello'や'?'のような文字列を渡すこともできます。
例えば、現在カーソルがテキストフィールドにないとして、HOMEキーを押せばページの最上部に、ENDキーを押せばページの最下部に、ブラウザがスクロールします。以下の内容を対話型シェルに入力して、send_keys()呼び出しがページをスクロールさせる様子を確認してください。
>>> from selenium import webdriver
>>> from selenium.webdriver.common.by import By
>>> from selenium.webdriver.common.keys import Keys
>>> browser = webdriver.Firefox()
>>> browser.get('https://nostarch.com')
>>> html_elem = browser.find_element(By.TAG_NAME, 'html')
>>> html_elem.send_keys(Keys.END)  # 最下部にスクロール
>>> html_elem.send_keys(Keys.HOME)  # 最上部ににスクロール
<html>タグはHTMLのベースタグです。HTMLファイルのすべての内容は<html>と</html>で囲まれています。<html>タグを通じてウェブページ全体にキー入力を送るには、browser.find_element(By.TAG_NAME, 'html')を呼び出すのがよいです。例えば、ページの最下部までスクロールしたらコンテンツが読み込まれる場合に、この方法が使えます。
Seleniumにはここで紹介したよりもたくさんの機能があります。ブラウザのクッキーを操作したり、ウェブページのスクリーンショットを取得したり、任意のJavaScriptを実行したりできます。これらの機能につきましては、https://
Playwrightでブラウザを制御する
Playwrightは、Seleniumと似た、より新しいブラウザ制御ライブラリです。今のところはSeleniumほど広く使われてはいませんが、学習する価値のある機能を備えています。画面上に実際のブラウザウィンドウを開かずにブラウザをシミュレートする、ヘッドレスモードでの実行がその一つです。バックグラウンドでウェブスクレイピングの自動作業を実行するときなどに使えます。Playwrightのドキュメントはhttps://
Playwrightでは、Seleniumと比べて、個々のブラウザのウェブドライバをインストールするのが簡単です。Windowsではpython -m playwright install、macOSとLinuxではpython3 –m playwright installを、ターミナルウィンドウから実行すれば、Firefox、Chrome、Safariのウェブドライバをインストールできます。PlaywrightはSeleniumと似ていますから、この節ではウェブスクレイピングとCSSセレクタ一般については説明しません。
Playwrightで制御されたブラウザを立ち上げる
Playwrightをインストールしたら、以下のプログラムを試してください。
from playwright.sync_api import sync_playwright
with sync_playwright() as playwright:
    browser = playwright.firefox.launch()
    page = browser.new_page()
    page.goto('https://autbor.com/example3.html')
    print(page.title())
    browser.close()
このプログラムを実行すると、Firefoxブラウザを立ち上げてhttps://
Playwrightは、実行がwith文のブロックに入るときにstart()メソッドを、出るときにstop()メソッドを、自動的に呼び出します。Playwrightには、操作が完了するまで関数が値を返さない同期モードがあります。このモードでは、ページの読み込みが終わる前に要素を見つけようとする事態を防げます。Playwrightの非同期機能は本書の範囲外です。
Playwrightは、デフォルトで、ヘッドレスモードで実行されるため、ブラウザウィンドウが現れません。ブラウザウィンドウが現れず、またPlaywrightではwith文内にコードを書くために、デバッグがやりにくいです。Playwrightをステップごとに実行するには、対話型シェルに以下の内容を入力してください。
>>> from playwright.sync_api import sync_playwright
>>> playwright = sync_playwright().start()
>>> browser = playwright.firefox.launch(headless=False, slow_mo=50)
>>> page = browser.new_page()
>>> page.goto('https://autbor.com/example3.html')
<Response url='https://autbor.com/example3.html' request=<Request
 url='https://autbor.com/example3.html' method='GET'>>
>>> browser.close()
>>> playwright.stop()
playwright.firefox.launch()のキーワード引数にheadless=Falseとslow_mo=50を指定しています。これにより、ブラウザウィンドウが画面上に現れるようになり、何が起こっているのかを確かめやすくするために操作ごとに50ミリ秒遅延させます。ウェブページを読み込むための停止を考える必要はありません。Playwrightは、一つの操作が終わる前に次の操作に移らないという点で、Seleniumよりも優れています。
Browserメソッドのnew_page()が返すPageオブジェクトは、新しいブラウザウィンドウの新しいタブを表しています。Playwrightでは複数のブラウザウィンドウを同時に開くことができます。
ブラウザのボタンをクリックする
Playwrightでは、browser.new_page()が返すPageオブジェクトの以下のPageメソッドで、ブラウザのボタンのクリックをシミュレートできます。
page.go_back() 戻るボタンのクリック
page.go_forward() 進むボタンのクリック
page.reload() 更新ボタンのクリック
page.close() ウィンドウを閉じるボタンのクリック
ページの要素を見つける
Playwrightには、俗にロケーターと呼ばれるLocatorオブジェクトを返す、Pageオブジェクトメソッドがあります。Locatorオブジェクトはウェブページの「あり得る」HTML要素を表します。「あり得る」というのは、Seleniumでは要素が見つからなければすぐにエラーを送出するのに対し、Playwrightではページが要素をあとで動的に作成する可能性があることが考慮されるからです。これは役立ちますが、悪影響もあります。要素が存在しなければ、Playwrightは要素が現れるのを待って30秒停止します。
単に書き間違えただけの場合は、この30秒の停止はうっとうしいです。ページに要素が存在して見えているかどうかを即座にチェックするには、ロケーターが返すLocatorオブジェクトのis_visible()メソッドを呼び出します。page.query_selector('selector')を呼び出すこともできます。selectorの部分には要素のCSSセレクタまたはXPathセレクタの文字列を指定します。page.query_selector()メソッドは即座に値を返します。Noneが返されたら、その時点で指定した要素がページに存在しないということです。Locatorオブジェクトはウェブページの複数のHTML要素にマッチする可能性があります。表13-5にPlaywrightのロケーターをまとめました。
ロケーター |
返されるLocatorオブジェクト |
|---|---|
page.get_by_role(role, name=label) |
指定したroleの要素(オプションでlabelも指定可能) |
page.get_by_text(text) |
要素内に指定したテキストを含む要素 |
page.get_by_label(label) |
<label>にテキストがマッチする要素 |
page.get_by_placeholder(text) |
プレースホルダーのテキストがマッチする<input>と <textarea>要素 |
page.get_by_alt_text(text) |
alt属性の値がマッチする<img>要素 |
page.locator(selector) |
CSSセレクタまたはXPathセレクタがマッチする要素 |
get_by_role()メソッドはARIA(Accessible Rich Internet Applications)を利用します。ARIAとは、視覚などの障がいを持つユーザーのために調整するために、ソフトウェアがウェブページのコンテンツを識別する一連の標準です。例えば、“heading”ロールは<h1>から<h6>のタグに適用され、<h1>と</h1>で囲まれたテキストをget_by_role()メソッドのnameキーワード引数で特定できます。(ARIAはこれだけにとどまりませんが、それを説明するのは本書の範囲を超えます。)
開始タグと終了タグの間のテキストにより要素を特定することもできます。page.get_by_text('is a link')を呼び出すと、<a href="https://inventwithpython.com”>This text is a link</a><a>要素を特定します。要素を特定するには、大文字と小文字を区別しない部分文字列でマッチさせれば十分であることが多いです。
page.get_by_label()メソッドは<label>タグと</label>タグの間にあるテキストで要素を特定します。例えば、page.get_by_label('Agree')は<label>Agree to disagree: <input type="checkbox" /></label>の<input>チェックボックス要素を特定します。
<input>タグと<textarea>タグには、ユーザーが実際のテキストを入力するまで表示されるプレースホルダーを表すplaceholder属性があります。例えば、page.get_by_placeholder('admin')は<input id="login_user" placeholder="admin" />の<input>要素を特定します。
ウェブページ上の画像には、目の不自由なユーザーのためなどに利用する、その画像についてalt属性に記述する代替テキストがあります。ブラウザによっては、マウスカーソルを画像にホバーすると、ツールチップで代替テキストが表示されます。page.get_by_alt_text('Zophie')を呼び出すと、<img src="wow_such_zophie_thumb.webp" alt="Close-up of my cat Zophie." />の<img> 要素が返されます。
CSSセレクタでLocatorオブジェクトを取得するなら、locator()を呼び出してセレクタ文字列を渡してください。これはSeleniumのfind_elements()メソッドでBy.CSS_SELECTOR定数を使うのと似ています。
メソッド |
説明 |
|---|---|
get_attribute(name) |
<a href="https://nostarch.com">ではhref属性の値'https://nostarch.com'を返すように、その要素の指定した名前の属性の値を返す |
count() |
Locatorオブジェクトのマッチした要素数を返す |
nth(index) |
nth(3)が4番目にマッチした要素を返すように、Locatorオブジェクトのマッチしたn番目の要素を返す(最初の要素は0番目) |
first |
最初にマッチしたLocatorオブジェクトを返す(nth(0)と同じ) |
last |
最後にマッチしたLocatorオブジェクトを返す(マッチした要素が5つならnth(4)と同じ) |
all() |
個々のマッチした要素を含むLocatorオブジェクトのリストを返す |
inner_text() |
<b>hello</b>なら'hello' のように要素内のテキストを返す |
inner_html() |
<b>hello</b>なら'<b>hello</b>'のように要素内のHTMLソースを返す |
click() |
リンク、チェックボックス、ボタンなどの要素で、その要素のクリックをシミュレートする |
is_visible() |
要素が見える状態ならTrueを返し、見えない状態ならFalseを返す |
is_enabled() |
input要素が有効ならTrueを返し、無効ならFalseを返す |
is_checked() |
チェックボックスやラジオボタンの要素で選択された状態ならTrueを返し、選択されていない状態ならFalseを返す |
bounding_box() |
ページ内でその要素の位置を表す'x' と 'y'、その要素のサイズを表す 'width'と'height' のキーを持つ辞書を返す |
Locatorオブジェクトは複数の要素を表すことがありますから、ゼロ始まりのnth()メソッドで個々の要素を表すLocator オブジェクトを取得します。例えば、新しいファイルエディタのタブを開いて、次のプログラムを入力してください。
from playwright.sync_api import sync_playwright
with sync_playwright() as playwright:
    browser = playwright.firefox.launch(headless=False, slow_mo=50)
    page = browser.new_page()
    page.goto('https://autbor.com/example3.html')
    elems = page.locator('p')
    print(elems.nth(0).inner_text())
    print(elems.nth(0).inner_html())
Seleniumの例と同じように、このプログラムは以下のように出力します。
This <p> tag puts content into a single paragraph.
This <p> tag puts <b>content</b> into a <i>single</i> paragraph.
page.locator('p')は、そのウェブページのすべての<p>要素のLocatorオブジェクトを返し、nth(0)メソッド呼び出しで最初の<p>要素のLocatorオブジェクトだけを返すようにしています。Locatorオブジェクトには、マッチした要素数を返すcount()メソッドがあります(Pythonのリストに対してlen()関数を適用するのと似ています)。マッチした最初の要素を含むfirst属性と、最後の要素を含むlast属性もあります。マッチした要素についてのLocatorオブジェクトのリストがほしければ、all()メソッドを呼び出します。
要素のLocatorオブジェクトがあれば、以下の節で説明するように、マウスのクリックやキーの入力ができます。
ページの要素をクリックする
Pageオブジェクトには、リンクやボタンやチェックボックス要素をクリックする、click()、check()、uncheck()、set_checked()メソッドがあります。これらのメソッドに要素のCSSセレクタまたはXPathセレクタを渡して呼び出すこともできますし、表13-6にまとめたPlaywrightのLocatorメソッドを使うこともできます。以下の式を対話型シェルに入力してみてください。
>>> from playwright.sync_api import sync_playwright
>>> playwright = sync_playwright().start()
>>> browser = playwright.firefox.launch(headless=False, slow_mo=50)
>>> page = browser.new_page()
>>> page.goto('https://autbor.com/example3.html')
<Response url='https://autbor.com/example3.html' request=<Request
 url='https://autbor.com/example3.html' method='GET'>>
>>> page.click('input[type=checkbox]')  # チェックボックスのチェック
>>> page.click('input[type=checkbox]')  # チェックボックスのチェックを外す
>>> page.click('a')  # リンクをクリック
>>> page.go_back()
>>> checkbox_elem = page.get_by_role('checkbox')  # Locatorメソッドの呼び出し
>>> checkbox_elem.check()  # チェックボックスのチェック
>>> checkbox_elem.uncheck()  # チェックボックスのチェックを外す
>>> checkbox_elem.set_checked(True)  # チェックボックスのチェック
>>> checkbox_elem.set_checked(False)  # チェックボックスのチェックを外す
>>> page.get_by_text('is a link').click()  # Locatorメソッドを使う
>>> browser.close()
>>> playwright.stop()
check()メソッドとuncheck()メソッドは、チェックボックスに対してclick()を呼び出すよりも信頼性が高いです。click()メソッドはチェックボックスを反対の状態にトグルしますが、check()とuncheck()は現在の状態が何であれ指定した状態にします。set_checked()メソッドにTrue またはFalseを渡して呼び出しても同じです。
フォームに入力して送信する
Locatorオブジェクトには、文字列を取りそのテキストで<input>要素または<textarea>要素を埋めるfill()メソッドがあります。example3.htmlウェブページのログインフォームのようなオンラインフォームに入力するのに便利です。
>>> from playwright.sync_api import sync_playwright
>>> playwright = sync_playwright().start()
>>> browser = playwright.firefox.launch(headless=False, slow_mo=50)
>>> page = browser.new_page()
>>> page.goto('https://autbor.com/example3.html')
<Response url='https://autbor.com/example3.html' request=<Request
url='https://autbor.com/example3.html' method='GET'>>
>>> page.locator('#login_user').fill('your_real_username_here')
>>> page.locator('#login_pass').fill('your_real_password_here')
>>> page.locator('input[type=submit]').click()
>>> browser.close()
>>> playwright.stop()
現在要素に入力されているテキストをすべて消去するclear()メソッドもあります。Seleniumとは異なり、Playwrightにはsubmit()メソッドがありません。よって、送信ボタンの要素にマッチするLocatorオブジェクトについてclick()を呼び出す必要があります。
特別なキーを入力する
Locatorオブジェクトのpress()メソッドでウェブページの要素にキー入力をシミュレートできます。例えば、現在カーソルがテキストフィールドにないとして、HOMEキーを押せばページの最上部に、ENDキーを押せばページの最下部に、ブラウザがスクロールします。以下の内容を対話型シェルに入力して、press()呼び出しがページをスクロールさせる様子を確認してください。
>>> from playwright.sync_api import sync_playwright
>>> playwright = sync_playwright().start()
>>> browser = playwright.firefox.launch(headless=False, slow_mo=50)
>>> page = browser.new_page()
>>> page.goto('https://autbor.com/example3.html')
<Response url='https://autbor.com/example3.html' request=<Request
url='https://autbor.com/example3.html' method='GET'>>
>>> page.locator('html').press('End')  # 最下部にスクロール
>>> page.locator('html').press('Home')  # 最上部ににスクロール
>>> browser.close()
>>> playwright.stop()
press()には、'a'や'?'のような文字列を渡せますし、'Shift'、'Control'、'Alt'、'Meta'、'Control+A'や以下の特別なキーの文字列も渡せます。
'Backquote'    'Escape'    'ArrowDown'
'Minus'     'End'       'ArrowRight'
'Equal'     'Enter'     'ArrowUp'
'Backslash' 'Home'      'F1' to 'F12'
'Backspace' 'Insert'    'Digit0' to 'Digit9'
'Tab'       'PageUp'    'KeyA' to 'KeyZ'
'Delete'    'PageDown'
Playwrightにはここで紹介したよりもたくさんの機能があります。詳しくはhttps://
まとめ
退屈な作業は自分のコンピュータ上のファイルに限られません。プログラム的にウェブページをダウンロードできると、プログラムをインターネットに拡張できます。requestsモジュールを使うとダウンロードを簡単にできますし、HTMLの概念やセレクタの基本知識があれば、ダウンロードしたページをBeautifulSoupモジュールで解析できます。
しかしウェブベースの作業を完全に自動化するには、SeleniumパッケージやPlaywrightパッケージを通じてウェブブラウザを直接制御する必要があります。これらのパッケージを使うと、ウェブサイトにログインしてフォームを自動的に埋められます。ウェブブラウザはインターネットで情報をやり取りする最も一般的な方法ですから、これはプログラマの道具の中でも大きな力になります。
練習問題
1. webbrowserモジュールとrequestsモジュールとbs4モジュールの違いを簡単に説明してください。
2. requests.get()が返すのはどのような型のオブジェクトですか? ダウンロードしたコンテンツに文字列値としてアクセスするにはどうすればよいですか?
3. ダウンロードが成功したかどうかを判定するrequestsメソッドは何ですか?
4. requestsレスポンスのステータスコードを取得する方法を教えてください。
5. requestsレスポンスをファイルに保存する方法を教えてください。
6. オンラインAPIがレスポンスで返す代表的な2つのフォーマットは何ですか?
7. ブラウザのデベロッパーツールを開くキーボードショートカットは何ですか?
8. (デベロッパーツールで)ウェブページ上の特定の要素のHTMLを確認するにはどうすればよいですか?
9. id属性の値がmainである要素を見つけるCSSセレクタを記述してください。
10. class属性の値がhighlightである要素を見つけるCSSセレクタを記述してください。
11. 変数spamに要素<div>Hello, world!</div>のBeautiful SoupのTagオブジェクトを格納しているとします。そのTagオブジェクトから'Hello, world!'という文字列をどのように取得しますか?
12. link_elemという名前の変数にBeautiful SoupのTagオブジェクトが格納されています。そのTagオブジェクトのすべての属性にアクセスするにはどうしますか?
13. import seleniumを実行してもうまくいきませんでした。Seleniumをインポートする正しい方法を教えてください。
14. Seleniumのfind_element()メソッドとfind_elements()メソッドの違いは何ですか?
15. マウスのクリックやキーボードの入力をシミュレートする、SeleniumのWebElementオブジェクトのメソッドは何ですか?
16. Playwrightで、ページのすべてのテキストを選択するためにCTRL-A を押すのをシミュレートするロケーターメソッド呼び出しは何ですか?
17. Seleniumでブラウザの進む、戻る、更新ボタンをシミュレートする方法を教えてください。
18. Playwrightでブラウザの進む、戻る、更新ボタンをシミュレートする方法を教えてください。
練習プログラム
以下の練習プログラムを書いてください。
画像サイトダウンローダー
FlickrやImgurのような写真共有サイトに移動し、検索結果の画像をすべてダウンロードするプログラムを書いてください。検索機能のある写真サイトならどこでも機能するプログラムを書けます。
2048
2048は、矢印キーでタイルを上下左右にスライドさせるシンプルなゲームです。ランダムな方向にタイルをスライドさせても高得点になることがあります。https://
リンクの検証
ウェブページのURLを与えると、そのページのすべての<a>リンクを見つけて、そのリンク先のURLが“404 Not Found”ステータスコードになるかを確認するプログラムを書いてください。壊れているリンクを出力してください。
1答えはノーです。